


Bike Hoists – Overhead Pulley System with 100 lb Capacity for Bicycles or Ladders – Secure Garage Ceiling Storage by Rad Cycle
$33.13
Price: $33.13 - 33.13
(as of Feb 13, 2025 15:55:40 UTC – Details)
What is a Bike Hoist?
A bike hoist is a ceiling-mounted storage system designed to lift and store bicycles overhead, freeing up valuable floor space in your garage or home. This convenient solution uses pulleys, hooks, and locking mechanisms to secure bikes in place.
Key Features of Bike Hoists
Rubber-Coated Hooks
Rubber-coated hooks protect your bike from scratches and damage. This feature is essential to preserve the bike’s finish over time.
Easy Installation
Most bike hoists are simple to install, requiring only a few basic tools. You can mount them to a ceiling joist or rafter with minimal effort.
Robust Engineering
Many bike hoists are built to lift up to 100 pounds, accommodating a wide range of bicycle types and sizes.
Indoor Use
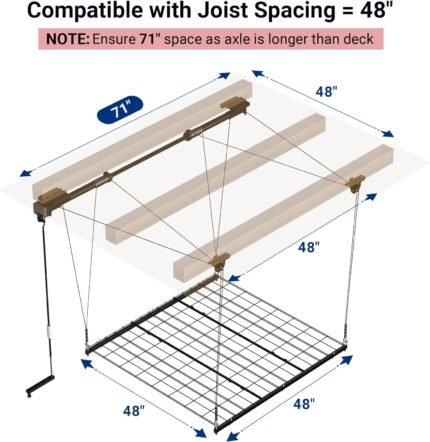
Designed for ceilings up to 12 feet high, bike hoists are perfect for maximizing indoor storage.
Safety Locks
A secure locking mechanism prevents accidental release, ensuring your bike stays safely suspended.
Benefits of Using a Bike Hoist
Space-Saving Solution
By storing bikes overhead, you free up floor space for other items or activities.
Protects Your Bike
Rubber-coated hooks and secure locking mechanisms prevent scratches and falls.
Easy Access
Hoists make it simple to lift and lower bikes, making storage more accessible than wall-mounted racks.
Versatility
Suitable for a wide range of bike sizes and types, bike hoists offer a flexible storage solution.
How to Install a Bike Hoist
- Locate a Ceiling Joist: Find a sturdy joist or rafter in your garage ceiling.
- Mark Mounting Points: Measure and mark the mounting points for the pulleys.
- Install Pulleys: Attach the pulleys to the ceiling using heavy-duty screws.
- Attach Hooks: Secure the rubber-coated hooks to the lifting ropes.
- Test the Mechanism: Lift and lower the bike a few times to ensure smooth operation and safety.
Best Practices for Using a Bike Hoist
Regular Inspections
Check the pulleys, ropes, and hooks for signs of wear to ensure long-term safety.
Proper Weight Distribution
Ensure the bike is balanced when lifting to prevent tipping or damage.
Locking Mechanism Engagement
Always engage the safety lock to prevent accidental drops.
Types of Bike Hoists
Ceiling Bike Rack Hoist
Ideal for garages with high ceilings, this type allows for maximum vertical storage.
Bike Garage Hoist
Designed specifically for garages, these hoists can handle heavier loads and provide easy access.
DIY Vertical Bike Hoist
For those who prefer a hands-on approach, DIY hoists offer customization options.
Frequently Asked Questions
1. How much weight can a typical bike hoist handle?
Most bike hoists can support up to 100 pounds, accommodating most bike types.
2. Is a bike hoist suitable for electric bikes?
Yes, as long as the hoist’s weight capacity is not exceeded.
3. Can I install a bike hoist on a sloped ceiling?
Yes, but additional adjustments may be needed for proper alignment.
4. Are bike hoists safe for children to use?
Adult supervision is recommended to ensure safety during use.
5. What ceiling height is required for a bike hoist?
Most hoists are designed for ceilings up to 12 feet high.
6. How do I prevent my bike from swinging?
Use Velcro straps or additional securing methods to stabilize the bike.
7. Can I install a bike hoist without drilling holes?
Some hoists offer adhesive or clamp-based options, but drilling is typically recommended for maximum stability.
8. How do I maintain my bike hoist?
Regularly check for wear on the ropes, pulleys, and hooks, and replace any damaged parts.
9. Can I hoist multiple bikes with one system?
Some hoists are designed to lift multiple bikes, but check the manufacturer’s guidelines.
10. What materials are best for bike hoists?
Look for hoists made of high-quality steel with rubber-coated hooks for durability and protection.
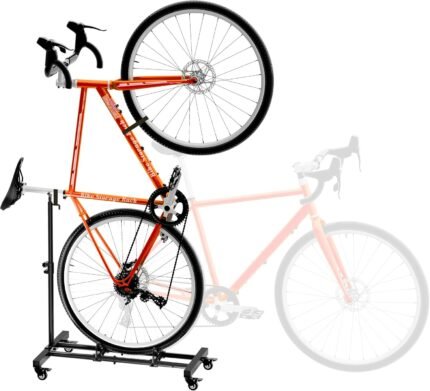
Explore our latest collection of bike stand vertical for you!


Vanilla Bean –
Here are some helpful suggestions as you mount this great product…
We researched a lot of similar products via online reviews, settling on this one as having the greatest likelihood of highest quality / best price and WE ARE VERY PLEASED.Here are some key things we’d like you to know:1. It takes some time to get these things mounted right, so just plan on it… you need to string the rope through the 4 pieces and pulleys just so, mount them on joists just so, and ensure the distance between the two pieces is just right for your bike. We recommend at least two people, chips and salsa, and perhaps a coors light ;)2. You can mount several bikes fairly close together if you offset the handlebars a bit forward and back among the mounts so that the handlebars never “share the same space.” We bought 5 of these bike hoists and mounted them to run parallel to the joists spaced at 24″ for mounting 5 bikes, one bike on each of five different joists mounted side-by-side. We bought long screws from the hardware store to replace those included in the package so we could securely screw through the drywall and further into the wood joists. We’d recommend including this hardware store errand in your time estimates for installation.3. It is important that the BACK tire go toward the wall where the rope coming out of the brake will be cleated. The whole rope and braking mechanism works so well this way … if you put the handlebars on the wall side like the picture for this product, then the handlebars block you moving the rope to operate the brake (trust, trust, trust me on this). If you put the back tire to the wall, the rope moves freely 🙂 By the way, the braking mechanism in the pulley seems so sturdy you might choose not to mount/use the cleat, but it does feel safer to us to use it.4. The distance between the ceiling and the bike will not be related to how far up the handlebars or the seat stick up … it will be the length of the hardware above where it hooks on — this may be important to you if you are mounting above a car and top-to-bottom distance matters. We mounted three of our bikes above a mini-van roof (the other two in front) and it was important to choose the lower profile bikes as not all of the bikes would have fit directly above the van. The “first bike” in line (at the front of the van) can be raised and lowered while the van is parked in the garage so that’s a great location for whichever bike you’ll be riding most frequently *or* for the bike of a kid not old enough to move the car in order to get his/her own bike down ;)5. On arrival, the instructions said the mounts would hold 100 pounds (which is more than we had read here online). Our tandem bike fully equipped is just under 50 pounds and seems very secure and happy.6. These are designed for the top rounded section of the lower hook assembly to fit into the rounded-out section of the ceiling mounted pulleys. The hook assembly will only fit into the ceiling assembly if the two pieces mounted on the ceiling are spaced EXACTLY to fit the specific bike where the hooks will grab the seat and handlebars. You’ll be much more pleased if you take the time to get this spacing right (you can tell by letting the hooks hang down while you are choosing the mounting position ~ gravity will allow the ropes to work as a plumb line :)7. Our thoughts relative to the complaints you might read about this product … A. The rope has been fine, no fraying or other problems. B. The “hook” ends could be hook-ier without a doubt, although we’ve not encountered any problems with them (perhaps because we don’t live in earthquake zones and we don’t move with great haste 🙂 C. Sometimes the front or back of the bike will raise or lower faster than the other end — when this happens we simply grab the lowest tire and give it a boost up to level it which happens quickly and then it stays level for the rest of the up or down operation so it’s never been a big concern. D. We mounted each bike directly into one joist (i.e., parallel/directly below one joist and not perpendicular between two joists) thus there was no need / benefit of mounting the brackets to a 2×4 first and then mounting the 2×4 to the ceiling — we just mounted straight into the ceiling.8. If you are going to cut the rope shorter, only do so when the bike is in the down position … once the bike is lowered, this cool contraption uses a lot of rope!9. Everyone in the family can operate these hoists easily — they are so much safer and usable than the stationary hooks we used to have that involved lifting heavy bikes on and off. Also, if you leave the kickstand down as you put your bike up, then when you lower the bike on the pulley later, it will land ready to go :)10. An unexpected benefit (beyond the extra garage space which we were hoping for) has been that all of us ride our bikes much more often than we used to. Putting the bikes up and getting them down is so easy that it has brought back a lot of frequency and joy to our bike riding experience.July 2014 Continuing Update ~ Still using them and still loving them :)Bon Appetit!
Ode to Onion Rings –
Works well and is easy to install
This is my second purchase of this hoist for hanging a bike in my garage. It was easy to install once I found the ceiling joists. I used my own screws, because the heads are too small on the ones that come with the hoist. My only complaint is that the rope seems lower quality as compared to the rope for a different hoist that I have for my extension ladder. It’s a great hoist for the money. Maybe more expensive bike hoists would have better ropes. 😉
Rick –
Good product, but some adjustment required
The hoist system was good, but expect to make some adjustments.Many had problems with the hooks and I agree. I adjusted the bike hooks by bending them up a little. I guess that they were giving about 25 degrees of bend.The screws that come with the kit were not very good also. The head broke on one of them, so I used better screws.Other than that, the system worked well. It pulled both bikes up with no problem and they went up with no problem.
Amazon Customer –
Well designed
Color me impressed. I have very little space, the garage is tiny, converted from a carport with a not quite 9′ ceiling. Wife wanted geezer bikes, but I didn’t want to put them in the crawl space. No fancy 11′ garage ceilings like the rich folks have. As you can see, I hung them over the bed of my tiny old pickup. Perfect fit.There are what, maybe four or five knockoff bke hoists on Amazon. This was the only one offering a package of a pair, and at a fair amount less than the other brands. On the Amazon postings they looked virtually identical except for the ceiling plate.Came very nicely packaged. Some reviews whined, but I very much liked the fit and finish of the pieces. The pulley material ought hold up for a long time even in the heat of summer. The ONLY thing I noticed was that the pulleys needed to be aligned a bit and their nuts tightened a bit, and I ended up noticing a strand on one of the cords torn. Wrapped the spot (toward the pulling end so it doesn’t go through a pulley). I think I’ll follow another reviewer’s choice and replace the cords with paracord.The directions suggest going through the trouble to mount the ceiling plates to another board, but for the life of me I don’t see the need as long as you have a stud finder and can center your bolts (purchased separately) into the ceiling joists. I used only 3/8″ x 2″ hex head lag bolts and small fender washers through the three available center holes in each plate rather than bothering with the (useless without another board) perimeter holes and smaller screws. The lag bolts should suffice just fine for 30 or so pound bikes unless you plan on letting your kid sit on one while you’re hoisting it. If you’re going to hoist your kid move up to 1/4″ x 2.5″ – those should fit through the holes. DO use some proper size fender washers to spread the load across the ceiling plate. Snug them but don’t crush the ceiling plate out of square. I did use four of he included screws to hold the two cleats to the wall.One reviewer replaced the hooks with paracord and caribeners, which I found unnecessary AS LONG AS you mount the ceiling plates so that the hooks hang exactly as instructed. I tried to knock a bike off the hooks pretty energetically with no success. Another reviewer mounted the plates to hook to the wheels rather than the bars and seat – If you’ve got even more limited space than I did, that looked like a great idea so you can pull the bikes all the way to the ceiling.All in all, I’m really pleased with the design and quality of the hoists, especially for the price. Raising and lowering the bikes is a breeze. The cord lock (to keep a bike from falling on your head) works flawlessly during both going up and down.Addendum – I know hardly anybody will read this, but I just noticed another review by a guy who actually had somebody else put it up, and was worried about the durability of the pulley axles (!!!!!!!) so he wasn’t going to use it. Wow. Okay, the physics is REALLY simple. The company advertises a hundred pound capacity. Even a fat old beach bike can’t weigh much over, say, 40 pounds. So that’s 10 pounds each on the four fulcra (anchors and pulleys) on the ceiling plate, and 20 each on the two hooks. Would I hang a motorcycle on it? No. But this thing is WAY more than strong enough to hold a standard issue 25-30 pound bycycle, Mine are cheap bikes, but I’d hang a $3000 racer up there without a second thought.
GT –
My garage ceiling had no visible “studs” to mount the bike pulley system to but with a good quality stud finder (Franklin M210) it actually saw through the drywall and filtered out the drywall cross members to locate the actual ceiling beams that were 3/4″ above the drywall. I then ripped a 35″ long 2×10 in half and screwed it into the ceiling beams then mounted the two pulley system parts to each end of the 35″ long “2×4”. It works like a charm and doesn’t take too much effort to boost our 65lb bikes to the top of our 10 foot garage ceilings. Other reviewers say the rope supplied is not great quality, but it works fine and they supply enough rope to mount this rig up on a 16 foot ceiling. I like the rope “brake”… just a tug in the right direction and it locks in place and holds the bike up. They also supply a cleat to tie the rope end to but I didn’t want the rope stretched across space to the cleat so I just tied the rope to the bike in case the brake slipped.
Ernesto –
Me parece que funciona muy bien, trae suficiente cuerda para colgarlas alto ( las mías están como a 3 metros, no hay problemas y se ve el material de buena calidad
MARCO SOUZA. –
FUNCIONA PERFEITAMENTE. EXCELENTE ACABAMENTO E FÁCIL MONTAR.
Amazon Customer –
I have been using these for 3 years now to store bikes overhead in the garage. There is no slippage on the bite to keep the ropes tight with bikes suspended. The claws to hold the bike seat and handle bars are perfect for fastening and have rubber grips on them to avoide slippage. The is plenty of rope to lower and raise the bikes up to 20 feet in the air. Very easy to install and quality product.
Jaime Miguel Monterde Arguello –
Es de buena calidad, funciona perfectamente y no es difícil colocarlo.